
views
Sectioning Your Hair

Detangle your hair with a comb or brush. It's important to make sure your hair has no tangles before beginning the braid. Comb out any knots by running a wide-tooth comb or brush in small, downward strokes beginning at the bottom of your hair and working your way up to your scalp. If you hair is very tangled or thick, try applying a leave-in conditioner or detangling spray to help you work through it pain-free. You can braid with damp or dry hair, but whatever you choose will change the look of your braid. If you braid wet hair you will have a tighter braid, while braiding dry hair creates a looser, more carefree look.

Secure your hair with an elastic band to form a base for the braid. You don't need to start with a ponytail, but it helps to keep the hair under control as you are learning to do the braid. Pull your hair up into a ponytail with an elastic band, securing it where you want your braid to start on your head. If you are pretty experienced with braiding your hair already, you can skip this step if you don't need it.

Separate your hair into 4 even sections, holding each between your fingers. To divide your hair into these, just gather all your hair into both hands and then split it between your two hands. Then, while holding each section separately in your hands, poke your index fingers on each hand through the middle of the section. This will create two more sections, for a total of four roughly even-sized sections of hair. An easy way to manage this is to hold two sections per hand, each between separate fingers. It might take some practice to get comfortable separating and holding the 4 strands. Just keep at it and it will become easier every time.
Braiding Your Hair
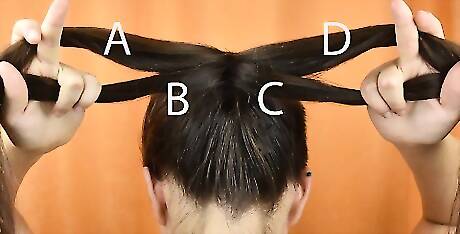
Imagine your four sections of hair are labeled A B C D, from left to right. It's easier to understand how to braid your hair if you imagine the strands as being four separate things that you are braiding together. When you begin each segment of the braid, relabel your sections as A B C and D in your head.
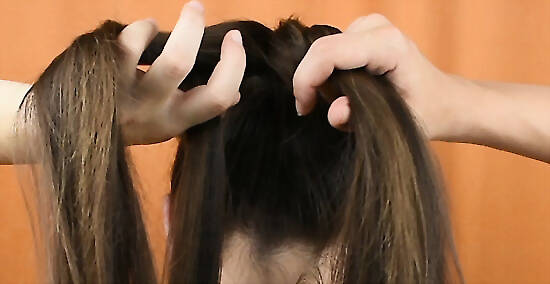
Bring strands B and D over the top of strands A and C to begin the braid. First, pull strand B over the top of strand A. Then, pull strand D over the top of strand C. Your four sections are now in the order of B A D C. You can begin the braid wherever you want on your head. Most commonly, the braid begins at about the same level as your ears, but you can choose to move the beginning up or down depending on the look you want to create and the length and cut of your hair.
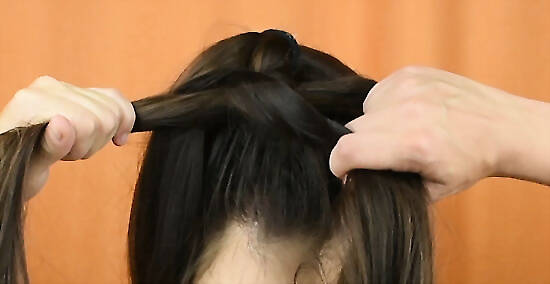
Cross section A over section D to complete one segment of the braid. Cross A, which is now the left-middle section, over top of D, the right middle section. Your four sections are now in the order of B D A C and you have completely one segment or round of the braid.
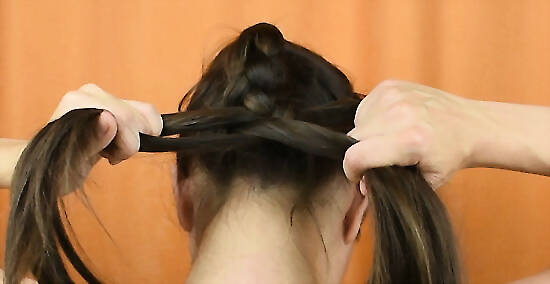
Continue braiding in the same pattern until all your hair is incorporated. In your mind, reassign the labels each round to make it easy to repeat the pattern. Think of strand B as A, D as B, A as C, and C as D. Then, repeat the same pattern as above to braid down the rest of your hair.
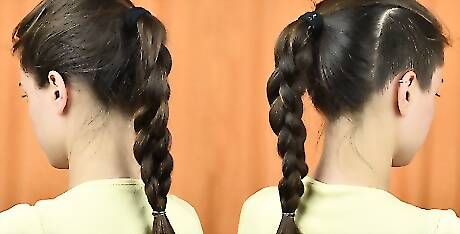
Secure the bottom of the braid with an elastic band. You can use any type of elastic band that you want, depending on the look you are trying to achieve. A popular choice is a clear elastic or a band that matches your hair color so that it blends in with the rest of your hair. It doesn't matter what you use, as long as it is tied very securely so that your braid doesn't fall out. To add a little volume to your braid, you can pull out on each the outer sections, separating them slightly. Be careful not to pull too much or you will pull out the braid.


Comments
0 comment