views
Tying a Runner’s Loop

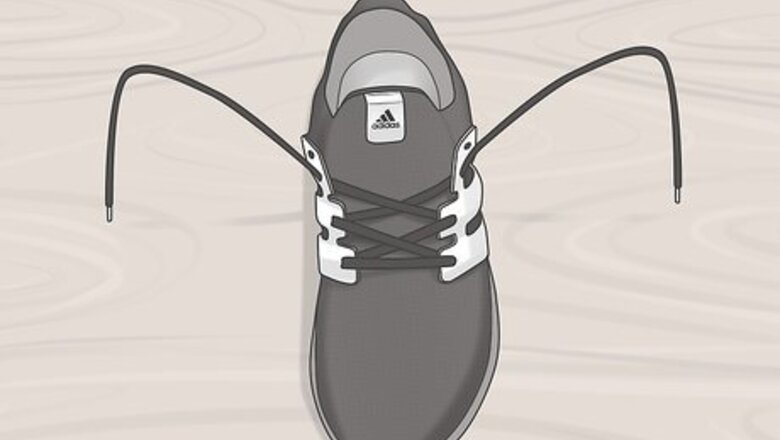
Lace the shoe in a criss-cross pattern up through the second-to-last eyelet. Thread the laces through the bottom eyelets from the outside in, making sure there is an even amount of lace on each side. Cross the laces over each other in an “X” pattern and thread them through the next set of eyelets up from the outside in. Cross the laces over again and thread them from the inside out through the next set of eyelets. You will now have only the top set of eyelets remaining to lace. Put the Ultra Boosts on your feet if you want to tie them using the runner’s loop so you can tighten the shoes on your feet as you go and get a snug fit.

Thread each lace from the outside in to the last eyelet on the same side. Don’t cross the laces over each other to thread the top eyelet. Pull each lace up to the eyelet straight above it and thread it back down through the eyelet to create a small vertical loop. The Adidas Ultra Boost will now have a straight line across the bottom eyelets, then 2 “Xs” up through the next 2 eyelets, and finally a small vertical loop on either side through the last eyelet.

Pull each lace straight across to the other side and through the loop. Pull the left lace through the vertical loop on the right side and pass the right lace through the vertical loop on the left side. Pull the laces tight to lock your heel in the shoe. You will now have 2 overlapping laces creating a very skinny “X” across the top eyelets.

Tie the laces in a double-knot bow. Tie the shoelaces into a standard bow as you would normally do to tie your shoes. Double-knot the bow for added security. This is one of the most secure ways you can tie your Adidas Ultra Boosts, especially if you plan on using them for running or other athletic activities. You won’t have to worry about the shoelaces coming loose or undone, even after running long distances or over rough terrain.
Making a DS Loop

Lace the shoe up all the way in a standard criss-cross pattern. Pass the laces through the bottom eyelets from the outside in so that there is a straight line across the bottom 2 eyelets and an even length of lace on each side. Cross the laces over each other in an “X” pattern and thread them from the outside in through the next pair of eyelets. Repeat this for the next pair of eyelets. Thread the laces from the inside out through the top eyelets. This is a good casual way to tie your Ultra Boosts if you want a relaxed look, but it’s not secure enough if you want to use them for athletic activities. You won’t be able to tighten them all the way to lock your heel in the shoes. The DS loop is how Adidas Ultra Boosts come tied in the box, so you can just leave the shoes laced as they are if you have a new pair.

Pinch the laces together at the top between your thumb and index finger. It’s easiest to do this with your non-dominant hand. Hold the laces together close to where they come out of the top eyelets. You can do this with the shoes off of your feet since it’s a loose style of tying your Ultra Boosts. Your hand will look like you are making the “OK” symbol at this point.

Hook your middle finger over the laces and flip your hand over. Loosely place your middle finger over the top of the laces right in front of where you are pinching them together. Rotate your hand 180 degrees. This will form a loop with your index and middle fingers in the middle of it.

Pass the middle part of the loose ends of the laces through the loop. Hold the loose ends of the laces in your other hand with your fingers about in the middle of their length. Use your fingertips to push the middle part of the laces through the loop, but don’t let the tips of the laces go through. As you pass the middle part of the laces through the loop, grab them with the fingertips that you used to form the loop to help pull them through. This will create another loop through the middle of the original loop.

Pull on the laces on both sides of the loop to cinch it tight. Hold the new loop you created in your non-dominant hand on one side and the bunch of laces on the other side in your dominant hand. Pull your hands in opposite directions to close the knot. You are now left with a loose knot that has a loop sticking out of one side and the tips of the laces poking out of the other side. This is how you often see new shoes tied right out of the box.
Lacing Ultra Boosts with the Uncaged Style

Thread the laces from the outside in through the bottom eyelets. Start lacing up the shoes as if you were going to use the normal criss-cross lacing style. Pull the ends simultaneously to make sure there is even length on both sides. Don’t pass the laces through the next set of eyelets up yet. This is the loosest style of “tying” Adidas Ultra Boosts. It will give your shoes a unique look and make them easy to slip on and off. This style is called “uncaged” both because it uses the extra space under the “cages” that hold the shoelace eyelets and because it gives a wild, free look to the laces. It is also sometimes called “hypebeast style.”}

Cross the laces and pass them up through the spaces in the lace cage. Pass the tip of each lace from the inside out through the space between the lace cage before the next set of eyelets. The laces with now be criss-crossed with the tips coming out from the sides of the lace cage. The lace cage is the rubbery part of the Ultra Boosts that has the eyelets on each side of the shoe.

Cross the laces and pull them up through the next set of eyelets. Pass the laces over one another in an “X” shape. Thread the tips up through the eyelets so the laces are coming out through them from the inside out. You will now have 2 overlapping “Xs” at the bottom half of the laces.

Repeat the steps for the next space in the lace cage and next set of eyelets. Criss-cross the laces and pass the ends up through the next space in the lace cage before the next eyelet. Cross them again and thread the tips up through the second-to-last set of eyelets. The laces will now have 4 overlapping “Xs” and you will have 1 set of eyelets remaining at the top.

Thread the laces up through the last eyelets and leave them loose. Pull the tips of the laces from the inside out through the top eyelets about halfway and leave them untied. Let the laces hang loose to stay true to the uncaged style. Since the shoes are laced loosely, you don’t need to tie the laces because the tips won’t reach the ground. If the tips do look like they are too close to the ground, then loosen up all the laces a bit more to shorten the amount that hangs at the end. You can tuck the tips of the laces under the top space in the lace cage if you don’t like the way they look hanging loose.


Comments
0 comment